Guides:Eviand's Wiki Guide Creation
More actions
Join the Playtest on Steam Now: SpiritVale
Using this Guide
This guide's main purpose is to let anyone create a guide page, so that they can publish their build in a static environment. If you feel like you have a great build that isn't anywhere in Discord or the Wiki, or that you wish the Wiki had something better than what it currently has, this page will give you some helpful guidance on how to navigate through a wiki.
If you need detailed instructions on how to start editing Wiki pages, I recommend reading up on how to Edit a Wiki Page and how to Start a New Wiki Page as this guide will assume that users understand how to edit pages, preview their edits, and publish that page. Note that the stuff in here overrides what is in those pages, so when it doubt, trust this page.
Creating the Page
The easiest way to create a page will be directly create a clickable link in one of the many guide spaces, such as Guides:Acolyte Builds.
- Edit the page you wish to add a guide to.
- Under any section, add a bullet point by using an asterisk (*)
- Create a name for your guide, starting with the word Guides, and with a colon (:)
- Example: Guides:Special Setup of Gear
- Wrap the new name with two sets of opening and closing brackets.
- Example: [[Guides:Special Setup of Gear]]
- Save the changes to the page.
The page will reload, and now you will see a Red link, like so: Guides:Special Setup of Gear.
Simply click on that new link, and you'll be editing the page in no time.
Naming Conventions
It's important for Wiki management to align with standard naming conventions in order to organize and sort pages into their correct locations.
Please make sure that when creating a new guide, always format it as "Guides:Example_Name". The colon tells the wiki that these pages belong to the Guides namespace, and this is where all guides will be part of as they are created.
Understanding the Editor
The wiki editor is split into two parts: Edit, and Edit Source.
- Edit allows you to directly edit the page in a visual way, and you can make changes directly to the page. Including via templates.
- Pros - Great for quick edits, like fixing mistakes or spelling errors, and allows for quick editing of templates.
- Cons - Doesn't have all the functionality that editing the source does.
- Edit Source allows for the traditional wiki editing experience, including the ability to utilize code.
- Pros - If the user knows what they are doing it's quicker and more efficient to edit directly in the source.
- Cons - Requires knowledge and experience to access, and can be very dense in some places with a lot of customer code.
Please use whatever version you are more comfortable with, and you can always ask for help in Discord if you need it, just @Eviand.
Templates and What They Do
A template is a pre-made wiki page that intended to be transcluded (or in other words, inserted) into another page. This allows for complex pieces of wiki formatting and code to be re-used across multiple pages, and allows for contributors to easily fill out a complicated table.
When creating a page it may be a good idea to see if a template exists that could make your job easier, and transclude it directly into your page. This page will also include common template inserts so that you can just use this to create one!
The insert looks like this:
{Example Insert
| Example Parameter = Example Value
|}
This will check for a template page called "Example Insert", and then you're more than welcome to fill in all the values. When you "Save changes" the insert transforms into the template, and automatically fills out all the empty fields.
It allows the creation of fancy tables like this, without any programming skills.
This:
 {{ClassInfoBox
| Role = Melee <br> Poison
| Weapons = Dagger
| STR = 9
| AGI = 12
| VIT = 1
| INT = 1
| DEX = 9
| LUK = 1
  }}
turns into that ------>
| Class Overview | |
|---|---|
| Role | Melee Poison |
| Weapons | Dagger |
| Attributes | |
| 9 | |
| 12 | |
| 1 | |
| 1 | |
| 9 | |
| 1 | |
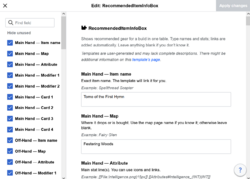
You can also use the normal edit function to directly edit a table. Simply doubleclick on any inserted template, and a popup box will show up that will let you enter in all the individual fields (click to expand):
Wiki Headers (Sections)
Wikis organize page information by putting things into headers, which are done by using the Equal Sign (=) surrounding a word or a line of text.
Example: == Level 2 Header ==
You can create different levels of headers by adding an additional set of equal signs, all the way to five levels:
- = Level 1 Header =
- == Level 2 Header ==
- === Level 3 Header ===
- ==== Level 4 Header ====
- ===== Level 5 Header =====
Note that for consistency, try to only use Levels 2 and 3 for most things, as the rest are often overkill, and can make a wiki page a lot more difficult to read and edit. However, go crazy if you feel that it will work!
An example section would be:
== Example Two Level Section ==
Quick description
=== Example Three Level Section ==
Another quick description
Guide Specific Section
This section will provide some guidance and input on how best to create different types of guides. Feel free to read up if you're looking to create a guide.
Class Build Guides
Class build guides are specific guides built around a core or unique mechanic around a class. They are often provide players with alternative ways to play a class, and provide a diversity of different play styles.
First, you should make your guide in one of the Class Build namespaces below:
- Guides:Warrior Builds
- Guides:Knight Builds
- Guides:Rogue Builds
- Guides:Scout Builds
- Guides:Mage Builds
- Guides:Summoner Builds
- Guides:Acolyte Builds
Once there, add in the name of your new guide, and begin editing it.
Here is a list of already to go templates: just insert these into your new page, and you'll be able to spin up any guide you want.
<noinclude>[[Category:Guides]]</noinclude>
{{Template:PageHeader
| PageImage =
| PageHeader =
}}

== Early Game Leveling ==

=== Levels 1–10 ===
Content here.

Recommended Maps:
*

Stat Priority:
*

----

=== Levels 10–30 ===
Content here.

Recommended Maps:
*

Stat Priority:
*

----

=== Levels 30–40 ===
Content here.

Recommended Maps:
*

Stat Priority:
*

=== Recommended Low-Level Gear ===
{{RecommendedItemInfoBox
|WeaponOneName=
|WeaponOneLink=
|WeaponOneMap=
|WeaponOneAttribute=
|WeaponOneModifierOne=
|WeaponOneModifierTwo=
|WeaponOneCards=
|WeaponTwoName=
|WeaponTwoLink=
|WeaponTwoMap=
|WeaponTwoAttribute=
|WeaponTwoModifierOne=
|WeaponTwoModifierTwo=
|WeaponTwoCards=
|ChestName=
|ChestLink=
|ChestMap=
|ChestAttribute=
|ChestModifierOne=
|ChestModifierTwo=
|ChestCards=
|LegwearName=
|LegwearLink=
|LegwearMap=
|LegwearAttribute=
|LegwearModifierOne=
|LegwearModifierTwo=
|LegwearCards=
|ShoeName=
|ShoeLink=
|ShoeMap=
|ShoeAttribute=
|ShoeModifierOne=
|ShoeModifierTwo=
|ShoeCards=
|HeadgearName=
|HeadgearLink=
|HeadgearMap=
|HeadgearAttribute=
|HeadgearCards=
|FaceName=
|FaceLink=
|FaceMap=
|FaceAttribute=
|FaceCards=
|UtilityName=
|UtilityLink=
|UtilityMap=
|UtilityAttribute=
|UtilityCards=
|AccessoryOneName=
|AccessoryOneLink=
|AccessoryOneMap=
|AccessoryOneAttribute=
|AccessoryOneCards=
|AccessoryTwoName=
|AccessoryTwoLink=
|AccessoryTwoMap=
|AccessoryTwoAttribute=
|AccessoryTwoCards=
|ArtifactName=
|ArtifactLink=
|ArtifactMap=
|ArtifactAttribute=
|ArtifactModifier=
}}

== Mid Game Leveling ==

=== Levels 40–60 ===
Content here.

Recommended Map:
*

Stat Priority:
*

=== Levels 60–80 ===
Content here.

Recommended Map:
*

Stat Priority:
*

=== Recommended Mid-Level Gear ===
{{RecommendedItemInfoBox
|WeaponOneName=
|WeaponOneLink=
|WeaponOneMap=
|WeaponOneAttribute=
|WeaponOneModifierOne=
|WeaponOneModifierTwo=
|WeaponOneCards=
|WeaponTwoName=
|WeaponTwoLink=
|WeaponTwoMap=
|WeaponTwoAttribute=
|WeaponTwoModifierOne=
|WeaponTwoModifierTwo=
|WeaponTwoCards=
|ChestName=
|ChestLink=
|ChestMap=
|ChestAttribute=
|ChestModifierOne=
|ChestModifierTwo=
|ChestCards=
|LegwearName=
|LegwearLink=
|LegwearMap=
|LegwearAttribute=
|LegwearModifierOne=
|LegwearModifierTwo=
|LegwearCards=
|ShoeName=
|ShoeLink=
|ShoeMap=
|ShoeAttribute=
|ShoeModifierOne=
|ShoeModifierTwo=
|ShoeCards=
|HeadgearName=
|HeadgearLink=
|HeadgearMap=
|HeadgearAttribute=
|HeadgearCards=
|FaceName=
|FaceLink=
|FaceMap=
|FaceAttribute=
|FaceCards=
|UtilityName=
|UtilityLink=
|UtilityMap=
|UtilityAttribute=
|UtilityCards=
|AccessoryOneName=
|AccessoryOneLink=
|AccessoryOneMap=
|AccessoryOneAttribute=
|AccessoryOneCards=
|AccessoryTwoName=
|AccessoryTwoLink=
|AccessoryTwoMap=
|AccessoryTwoAttribute=
|AccessoryTwoCards=
|ArtifactName=
|ArtifactLink=
|ArtifactMap=
|ArtifactAttribute=
|ArtifactModifier=
}}

== Late Game Leveling ==

=== Levels 80–100 ===
Content here.

Stat Priority:
*

=== Levels 100+ ===
Content here.

Stat Priority:
*

=== Recommended High-Level Gear ===
{{RecommendedItemInfoBox
|WeaponOneName=
|WeaponOneLink=
|WeaponOneMap=
|WeaponOneAttribute=
|WeaponOneModifierOne=
|WeaponOneModifierTwo=
|WeaponOneCards=
|WeaponTwoName=
|WeaponTwoLink=
|WeaponTwoMap=
|WeaponTwoAttribute=
|WeaponTwoModifierOne=
|WeaponTwoModifierTwo=
|WeaponTwoCards=
|ChestName=
|ChestLink=
|ChestMap=
|ChestAttribute=
|ChestModifierOne=
|ChestModifierTwo=
|ChestCards=
|LegwearName=
|LegwearLink=
|LegwearMap=
|LegwearAttribute=
|LegwearModifierOne=
|LegwearModifierTwo=
|LegwearCards=
|ShoeName=
|ShoeLink=
|ShoeMap=
|ShoeAttribute=
|ShoeModifierOne=
|ShoeModifierTwo=
|ShoeCards=
|HeadgearName=
|HeadgearLink=
|HeadgearMap=
|HeadgearAttribute=
|HeadgearCards=
|FaceName=
|FaceLink=
|FaceMap=
|FaceAttribute=
|FaceCards=
|UtilityName=
|UtilityLink=
|UtilityMap=
|UtilityAttribute=
|UtilityCards=
|AccessoryOneName=
|AccessoryOneLink=
|AccessoryOneMap=
|AccessoryOneAttribute=
|AccessoryOneCards=
|AccessoryTwoName=
|AccessoryTwoLink=
|AccessoryTwoMap=
|AccessoryTwoAttribute=
|AccessoryTwoCards=
|ArtifactName=
|ArtifactLink=
|ArtifactMap=
|ArtifactAttribute=
|ArtifactModifier=
}}

== Endgame Overview ==
Content here.

=== Recommended End Game Gear ===
{{RecommendedItemInfoBox
|WeaponOneName=
|WeaponOneLink=
|WeaponOneMap=
|WeaponOneAttribute=
|WeaponOneModifierOne=
|WeaponOneModifierTwo=
|WeaponOneCards=
|WeaponTwoName=
|WeaponTwoLink=
|WeaponTwoMap=
|WeaponTwoAttribute=
|WeaponTwoModifierOne=
|WeaponTwoModifierTwo=
|WeaponTwoCards=
|ChestName=
|ChestLink=
|ChestMap=
|ChestAttribute=
|ChestModifierOne=
|ChestModifierTwo=
|ChestCards=
|LegwearName=
|LegwearLink=
|LegwearMap=
|LegwearAttribute=
|LegwearModifierOne=
|LegwearModifierTwo=
|LegwearCards=
|ShoeName=
|ShoeLink=
|ShoeMap=
|ShoeAttribute=
|ShoeModifierOne=
|ShoeModifierTwo=
|ShoeCards=
|HeadgearName=
|HeadgearLink=
|HeadgearMap=
|HeadgearAttribute=
|HeadgearCards=
|FaceName=
|FaceLink=
|FaceMap=
|FaceAttribute=
|FaceCards=
|UtilityName=
|UtilityLink=
|UtilityMap=
|UtilityAttribute=
|UtilityCards=
|AccessoryOneName=
|AccessoryOneLink=
|AccessoryOneMap=
|AccessoryOneAttribute=
|AccessoryOneCards=
|AccessoryTwoName=
|AccessoryTwoLink=
|AccessoryTwoMap=
|AccessoryTwoAttribute=
|AccessoryTwoCards=
|ArtifactName=
|ArtifactLink=
|ArtifactMap=
|ArtifactAttribute=
|ArtifactModifier=
}}

== Tips and Tricks ==
Content here.


